A Birthday Brew

Saturday, April 30, 2016

Hello crafty friends!
Today I am playing along with the Inky Paws Challenge over at Newton's Nook Designs!


They have this super fun sketch for you this month!
Here is my take...;-)


Isn't this adorable!? (I know, I'm saying it myself...lol)


Newton Loves Coffee | 4x6 Photopolymer Stamp Set | Newton's Nook Designs


The Newton Loves Coffee set was just perfect for this sketch!
I love when stamps do the job for me...;-)
See that adorable image where Newton is at the table? That one gave me the idea for my card today!


I stamped the image on 3" x 4-1/4" watercolor paper then started to color the table with a flat paintbrush. I used Crumb Cake, Chocolate Chip, Sahara Sand, and a few streaks of Bermuda Bay. I only used very little of water to create "wood grains".
Her coffee mug was colored with Bermuda Bay and Encore Gold Reinkers. Inside the mug is of course some coffee, which was colored with Early Espresso, then some glossy accent and heart shaped steam were added. 


This stamp set also comes with cute sentiments to go with the cute images. Since tags remind me of gifts, this one was it ;-) It was heat embossed with Early Espresso along with those little coffee beans, which are just adorable, right!? I used the same coloring technique  on the table to add blue on the tag. 


People enjoy reading at coffee shops, right? So I thought this patterned paper fit well ;-) 
I just love when everything on your card goes so well together like milk and cookies!


My notes...

Stamp: Newton Loves Coffee (Newton's Nook Designs)
Paper: Crumb Cake, Watercolor Paper, Typeset SDSP, Gold Glimmer Paper, Vellum
Ink: Sahara Sand, Crumb Cake, Chocolate Chip, Early Espresso, Bermuda Bay, Crisp Cantaloupe, Encore Gold Reinkers, Versamark
Accessory: Bermuda Bay 1/4" Ribbon, Glossy Accent (Ranger)
Tool: Heat Tool, Early Espresso Stampin' Emboss Powder, Gift Tags Elle-ments Die (Avery Ellen), Cups and Kettle Framelits Die(SU!)


Thank you so much for stopping by!
Hope you enjoyed it!


{Heart} You

Wednesday, April 27, 2016

Hi there, lovelies!
I have a super simple but super cute card to share today!
This was inspired by the Little Tangles Challenge over at Neat & Tangled ;-)


Here it is ;-)


{CAS}
We all know that this means Clean and Simple, but sometimes I think it should be Cute and Simple! *Ha Ha* This card actually would apply to both though.


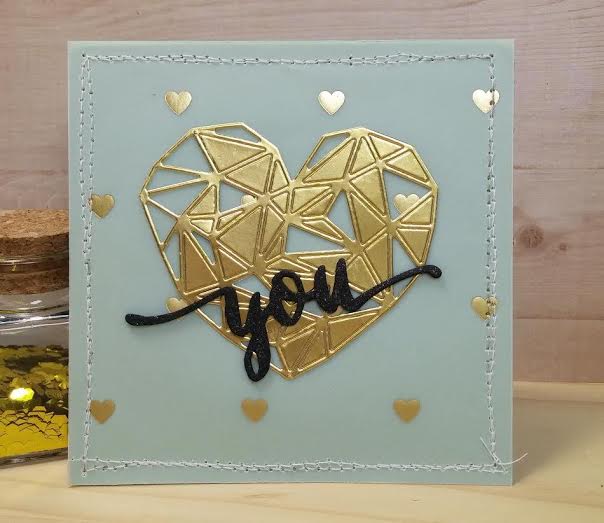
After die cutting this beautiful heart, some of the inside pieces just fell out, and I liked the look of it! So I popped a few more out myself, and put washi tape on the back to hold the rest in place. 
All I wanted to add was "you", and this one looks just right on my heart! I die cut the sentiment 3 times then mounted them on top of each other as usual, then some sparkle was applied with the clear glitter pen.


I chose mint for my base, I think gold looks so beautiful against it!
I had to have my vellum, and this one with a bunch of tiny hearts was perfect ;-)
I trimmed it down to 4-1/4" x 4-1/4" and directly sewed it onto m base card. 


My notes...

Paper: Mint Macaron, Basic Black, Gold Foil Sheet, Gold Fancy Designer Vellum Foil
Ink: Wink of Stella Clear Glitter Pen
Tool: Heart of Gold Die (Neat and Tangled), Hand Lettered Thanks Die (WPlus9), Sewing Machine


Thank you so much for stopping by!
Hope you enjoyed it!


Cupcake Inspirations Challenge 357

Sunday, April 24, 2016

Hi there!
It's time for another Cupcake Inspirations Challenge!
This week's sponsor is Doodle Pantry ;-)


Isn't this the cutest little theme!?
Here is my take...


I though about making my own background with black dots on red, but well, I had to have a cute little ladybug, you know...*giggle*


The sponsor generously provided us with digi images, thank you!
I printed this already-colored-ladybug, which is one of many images that the Critter Bugs set gives you. I love that they give you the option to print colored or outline only!
I water colored the background with Gumball Green (I just LOVE this green...<3 cut="" die="" down="" font="" frame="" it="" my="" nbsp="" on="" scallop="" sewed="" the="" then="" vellum.="" with="">
That Poppy Parade heart was punched out with the Heart to Heart Punch from Stampin' Up!, it's one of the things I'll never be able to part with... just love those 3 hearts! 


"Hugs from Bugs"
That sentiment is just perfect in black and white for this card, don't you think!?


My notes...

Stamp: Critter Bugs (Doodle Pantry)
Paper: Whisper White, Poppy Parade, Basic Black, Watercolor Paper, Stacked with Love DSP Stack, Botanical Designer Vellum Pack (SU!)
Ink: Gumball Green (SU!)
Tool: Essentials:Audrey and Ina Word: Hugs Cutaways (Winnie and Walter), Hear to Heart Punch (SU!), Sewing Machine


Thank you so much for stopping by!
Hope you enjoyed it!
Now don't forget to head over to the Cupcake Inspirations Challenge Blog and bug the rest of the DT team...*hee hee*


Make a Wish

Saturday, April 23, 2016

Hello there!
I made a card for my baby cousin, and it was inspired by these colors over at the Pals Paper Arts Challenge!


Pals Paper Arts PPA297


I had a mixed feeling about this color combo...
Pool Party is my favorite color of all! but Wisteria Wonder...not so much.
BUT! I was making a birthday card for my cousin who loves Disney (well, who doesn't though, right!?) and had this digi image that I wanted to use, and these colors actually worked very well!


I had already had this design in my head, then one of the blogs that I follow was featuring her card for the CAS[E] this Sketch Challenge, and it had the same sketch! 


Well, my sketch was up-side-down though, but why not play along!?


I had been having some difficulties printing on watercolor paper again, then I realized, I wasn't using the same kind of watercolor paper! So I got a pad of them, and what do you know! My stubborn printer likes this paper! 
So I was able to print this gorgeous castle image that I got from A Day for Daisies, colored it with Pool Party, Daffodil Delight, Wisteria Wonder, and Smoky Slate Stampin' Reinkers. The bushes were colored with the mixture of Pool Party and Daffodil Delight, don't they make a pretty green!? The background was very lightly colored with Soft Sky. (I realized later that blue sky didn't make sense with the stars in the sky...LOL)


"Make a Wish" 
Because it's a birthday card, also fairy tales are all about dreams and wishes coming true, right? Just perfect ;-) A little sparkle was added with my lovely glitter pen. 


I really didn't want to disturb the beauty of this castle image, but it needed just a little more sparkles...so what do we add? Sequins! Those tiny iridescent sequins make this whole card so magical :-) and a few tiny silver stars won't distract the design either, right ;-)


My notes...

Stamp: Where Dreams Come True (A Day for Daisies), Count The Stars (My Favorite Things)
Paper: Pool Party, Watercolor Paper
Ink: Memento Tuxedo Black, Pool Party, Daffodil Delight, Wisteria Wonder, Smoky Slate, Soft Sky Stampin' Reinkers, Wink of Stella Clear Glitter Pen
Accessory: Sequins (Pretty Pink Posh)
Tool: Die-namics Stars and Wishes, Blueprint 15 (My Favorite Things)


Thank you so much for stopping by!
Hope you enjoyed it!


Pretty Kitty

Friday, April 22, 2016

Hello there, lovelies!
I am playing along with the Paper Smooches Challenge today!


This month's theme is "Black and White with a Pop of Color".
I've already played it once earlier this month, but it is such a fun theme, I couldn't resist!


Don't you agree that inspirations are everywhere!?
My kids have so many plushy blankets, and one of them has paw prints all over it. For some reason that gave me this design...*LOL* 


I chose Soft Sky as my pop of color because I wanted to give my pretty white kitty blue eyes. I die cut this pretty feline twice in Whisper White and Basic Black, then die cut just his head twice in Soft Sky and Blushing Bride to get his eyes and nose. I gave him a pretty bow in Soft Sky also ;-)


I die cut the Whisper White cardstock with the Wonky Stitches die, then with the paw print 3 times. It was mounted on black and white stripes patterned paper. 
I also die cut "meow" in Soft Sky then brushed over it with my trusty clear glitter pen.


It really didn't take me all that long to make this modern card.
I am pretty happy with how it turned out! ;-)


My notes...

Paper: Whisper White, Basic Black, Soft Sky, Blushing Bride, Typeset SDSP
Ink: Wink of Stella Clear Glitter Pen
Accessory: Soft Sky 1/8" Ribbon
Tool: Cat Icons Wise Die (Paper Smooches), Wonky Stitches Elle-ment Die (Avery Elle), Newton Unwinds Die (Newton's Nook Designs)


Thank you so much for stopping by!
Hope you enjoyed it!


Home Sweet Home

Thursday, April 21, 2016

Hello my friends!
I am playing along with the Mixed Media Card Challenge today!
Check out their theme this month...;-)


So fun, right!?
Their DT members created some really awesome cards!
Here is my take...


Originally, I didn't think I could come up with any designs with "sunshine", but their optional element (which I usually forget) helped me with this design!


I die cut the sun twice in Daffodil Delight, mounted them on top of each other, then I stamped the word sunshine randomly with the Alphabet Rotary Stamp. 


I heat embossed the words "home" and "sweet" on these die cut clouds, then very lightly colored them with Pool Party.  


These bricks must be the smallest brick image there is...*Hee Hee*
I remembered that this cute little house had brick walls, and that is how I came up with this design! I stamped the image on watercolor paper, colored with Stampin' reinkers then die cut it. I wanted to give it a chipboard feel so 3 more of them were die cut then mounted on top of each other. 


I die cut "Home" in the Typeset SDSP, and you know how thin this paper is, so I die cut it two more times with cardstock. I wanted a couple more houses on the background, and I always say this but it is good to hoard old patterned papers! because I remembered that the Well Worn DSP has Cajun Craze, and look what I found!? Brick image! 
The bottom of the card was heat embossed with gold emboss powder, and blue and light gold mixed into green! Isn't it pretty!?


My notes...

Stamp: Holiday Home, Alphabet Rotary Stamp (SU!)
Paper: Crumb Cake, Pool Party, Cajun Craze, Daffodil Delight, Well Worn DSP, Typeset SDSP, Watercolor Paper
Ink: Versamark, Memento Tuxedo Black, Stazon Jet Black, Smoky Slate, Pool Party, Cajun Craze, Daffodil Delight Stampin' Reinkers (SU!)
Tool: Heat Tool, Pool Party Stampin' Emboss Powder, Enchanted Gold Emboss Powder (Ranger), Homemade Holiday Framelits (SU!), Spring Showers Lawn Cut (Lawn Fawn), In a Word: Home Cutaway (Winnie and Walter)


Thank you so much for stopping by!
Hope you enjoyed it!


Cupcake Inspirations Challenge 356

Sunday, April 17, 2016

Hello my crafty friends!
It is time for another Cupcake Inspirations Challenge!
This week's sponsor is Sami Stamps ;-)


Oh my! 
Are you loving these lovely, spring colors as much as I am!?
Here is my take...;-)


The sponsor generously provided us a digi image of our choice, thank you! and with the color combo in my head, I picked this beautiful flower ;-D


I colored this beauty with my Copic markers, but since I only have several colors, I used the colorless blender to lift some of the pink. I wasn't sure how it would turn out, but this is the best I could do... The leaves were colored with yellow then green. The sentiment was heat embossed with Blushing Bride emboss powder, then the whole thing was die cut with the oval, mounted on another oval that is a bit bigger.


Oh man, did I struggle to put this card together!!
I tried so many different things and finally settled with this pistachio doily that I got from Target and the Blushing Bride Ribbon stitched on the Whisper White cardstock that was embossed with big polka dots. I sawed that little pink butterfly for the finishing touch.
I think this design is a bit different from my usual style, but this will be just perfect for my mom ;-)


My notes...

Stamp: Spring Branch (Sami Stamps), My Mother (SU!)
Paper: Whisper White, Strawberry Slush, Subtles and In-Color DSP Stacks
Ink: Versamark, Copic Ciao Markers, Copic Sketch Colorless Blender 
Accessory: Blushing Bride Chevron Ribbon, Pistachio Doily (Target)
Tool: Heat Tool, Blushing Bride Stampin' Emboss Powder, Polka Dot Textured Impressions Embossing Folder, Bitty Butterfly Punch, Framelits Oval Collection, Die-namics Zig Zag Stitched Oval STAX (My Favorite Things), Sawing Machine


Thank you so much for stopping by!
Hope you enjoyed it!
Now let's hear over to the Cupcake Inspirations Challenge Blog and check out what my teammates have created!


Challenges

Saturday, April 16, 2016

Hi there!
I am playing along with 2 challenges today!


I know I sound like a broken record, but I love simple sketches!
This fabulous sketch is from Freshly Made Sketches.


Banner-MIX-it


This month's Mix It Up Challenge over at Ellen Hutson is to use Taylored Expressions products!
And here is my card...


I actually don't own anything from Taylored Expressions except this little thanks die that I received as a free gift from Ellen Hutson last year. I think it was the Black Friday deal? 
I thought this cute little thanks die fit perfectly in this fun sketch, and I knew immediately I wanted to stitch a snippet of ribbon underneath ;-)


Of course to play along with the Mix It Up Challenge, I needed to use some Essentials by Ellen products, and I thought some flowers would look pretty ;-) Paper piecing is such time consuming but the results are totally worth the fuss! Here I used Pear Pizzazz, Peach Parfait, Pool Party, and Calypso Coral.


I wanted to keep it clean, besides I think I have enough colors ;-) 
All it needed was some sequins, love it!


My notes...

Paper: Whisper White, Peach Parfait, Pool Party, Pear Pizzazz, Calypso Coral
Ink: Clear Wink of Stella Glitter Pen 
Accessory: Pool Party Seam Binding, 4 mm Lime Sorbet Sequins (Pretty Pink Posh)
Tool: Essentials By Ellen Designer Die Wild Garden (Ellen Hutson), Thanks Die (Taylored Expressions), Die-namics Blueprint 15 (My Favorite Things)


Thank you so much for stopping by!
Hope you enjoyed it!


London Fog

Friday, April 15, 2016

Hi there chaps!
I am playing along with the My Favorite Things Sketch Challenge today!


Awesome sketch!
Here is my take...


I really liked this simple sketch!
I looked though my big collection of MFT dies and these chevron borders caught my eyes!


I thought a little tour in London might be fun! 
I went to London with my bestie in March of 1996 right after we graduated from high school (Oh my! It's been 20 years!?) The weather was very gloomy and damp but we did not have one day with their famous fog! It was so much fun though... I'd love to go again, but this time I'd visit different places like the Aardman studio to see how Shaun the Sheep is made, look for a real Tardis (LOL), oh and maybe if I'm lucky, my favorite actor David Tennant is doing Hamlet and I'd get to see him! (a girl can dream...) 


Anyway,  that's what I made here, London fog!
I heat embossed some building images with Smoky Slate on Whisper White, then mounted that on my vellum base card so when it's closed, the images are "foggy" ;-)


Of course for my chevron borders, I had to use the colors from their flag!
I think their cabs are black, but I colored one in red, it's cuter that way ;-)
I love this card, I think it's so fun!


My notes...

Stamp: London Mouse (My Favorite Things), French Fry (Studio Calico)
Paper: Whisper White, Midnight Muse, Cherry Cobbler, Watercolor Paper, Vellum
Ink: Versamark, Stazon Jet Black, Cherry Cobbler, Smoky Slate, Daffodil Delight, Soft Sky Stampin' Markers
Tool: Heat Tool, Smoky Slate Stampin' Emboss Powder, Die-namics London Mouse, Chevron Stripes Border My Favorite Things)


Thank you so much for stopping by!
Hope you enjoyed it!


Fun Card

Tuesday, April 12, 2016

Hi there!
I am making a quick stop to share a card I made for my son's friend's birthday ;-)


I know it's not anything new, but this boy likes Minions, so how could I not make one!? ;-) I actually have never seen the movies Despicable Me, but I have seen funny little videos on social media and they are so cute! Those laughs...hee hee


I die cut 8 of 2-1/2" rings in Smoky Slate and one more in silver foil sheet. I glued all the Smoky Slate rings together, added plastic bag that is also die cut, then topped with the silver foil ring. I used this 1" googlie eye, added band and a mouth. The mouth was punched with 2" and 2-1/2" circle punches. 


Isn't his little hair cute!? *giggle*
I wrapped this black crochet yarn around my fingers several times, tied the middle  then cut the ends. I poked a little hole in my base and fed the yarn through and secured it with a piece of tape on the inside. 


All he needed was some denim. I used this blue Co'ordinations cardstock for some texture. I think he turned out so stinkin' cute! I also got my son's approval ;-)


My notes...

Paper: Daffodil Delight, Basic Black, Smoky Slate, Silver Foil Sheet, Blue Textured Cardstock (Co'ordinations)
Accessory: Black Crochet Yarn, 1" Googlie Eye
Tool: Circle Framelits Die, 2" and 2-1/2" Circle Punches, Piercing Tool


Thank you so much for stopping by!
Hope you enjoyed it!