Showing posts with label Kids. Show all posts

Newton's Nook Designs June Release Day 2

Tuesday, June 16, 2020

Hello, Newton lovers!
Today kicks off the Newton's Nook Designs June Release!
All the new products will be available for purchase this Friday the 19th in the Newton's Nook Designs Shop!
Today is day 2 of the reveal and we have another adorable stamp set along with the coordinating die set!


This is called the Bleat set.
These cute little goats are joining the NND farm where we have the Cluck, Moo, and Oink sets! Isn't it absolutely fun!!?
Okay, here is my take...;-)


Newton's Nook Designs Bleat Set - Naki Rager


Although the Bleat Set does come with cute and fun sentiments, I had to create my own for these 2 "butties" because I am such an ass...(get it!!? LOL)
I wanted to keep this card pretty simple so I die cut the frame using the new Slimline Frames & Windows Die Set (revealed yesterday) and trimmed off the 2 middle lines. Then I die cut 2 grass borders using the Land Borders Die Set, mounted one inside the frame, the other outside the frame.


Newton's Nook Designs Bleat Set - Naki Rager


I love Jen for so many reasons but one of them is that she draws seriously cute animal butts, and I LOVE animal butts!!! {LOL} As always, these guys were no-line watercolored and die cut out with the coordinating dies. Can you even stand how cute they are with their little tushies sticking up and out!!?


Newton's Nook Designs Bleat Set - Naki Rager


This sentiment sort of just popped in my head while figuring out the card design, and thanks to the awesome Essential Alphabet Die Set, I got to make one in rainbow colors! The little clouds were die cut using the 2 cloud dies borrowed from the Winston Takes Flight Die Set. 


{Would you like to win the “Bleat” Stamp Set?}
This stamp set will be given away to ONE lucky winner!

Here's how to win: Comment on the NND blog and Design Team blogs (see list below)! The winner will be chosen at random from the collective reveal posts. Make sure to check out each of their blogs and comment for your chance to win. You will not know which blog has been chosen so the more you comment on the better your chances are of winning! You have until Thursday June 18th at 9pm EST to comment  -- winners will be announced on the blog post on Friday, June 19th. 

Check out all the awesome Design Team Blogs below to enter:


Thank you so much for stopping by!
Hope you enjoyed it!


Newton's Nook Designs June Release Day 1

Monday, June 15, 2020

Hello, Newton lovers!
Today kicks off the Newton's Nook Designs June Release!
All the new products will be available for purchase this Friday the 19th in the Newton's Nook Designs Shop!
On day 1, we are showcasing a couple of AWESOME die sets along with a super adorable stamp and die sets! 


Here's the new Slimline Frames & Portholes Die Set to help you get started with those awesome lean and long cards that everyone is into!


This one is called the Slimeline Frames & Windows Die Set, those little dies inside are a bonus, isn't it fabulous!!?

And then here's the new Farming Fun Stamp and Die Sets!
This is just like the Love Quarry Set, which has 5 construction vehicles with fun sentiments!
Okay, here is my take...;-)


Newton's Nook Designs Farming Fun Set - Naki Rager


My younger son Kaius would totally LOVE this long shaker card with a vehicle!


Newton's Nook Designs Farming Fun Set - Naki Rager


I stamped the image with Antique Linen Distress Ink and did no-line watercoloring, then die cut it using the coordinating die. I die cut a couple more of the same vehicle to give a dimension so that the seed beads wouldn't go over the image. 


Newton's Nook Designs Farming Fun Set - Naki Rager


To create this continuous background, first I die cut the frame using the new Slimline Frames and Windows Die from watercolor paper, instead of popping out the stitched squares, I secured them in place by taping them with the purple tape on the back. Then I blended the sky leaving the bottom white and using the Hills and Grass Stencil, I applied this long dirt mountain and splattered some water. I had 5 more frames die cut and mounted on the base card so I could pop the colored squares in, add some copper sequins and clear seed beads in and covered it with the acetate sheet, finally carefully placed the colored frame on the top. 


{Would you like to win the “Farming Fun” Stamp Set?}
This stamp set will be given away to ONE lucky winner!
Here's how to win: Comment on the NND blog and Design Team blogs (see list below)! The winner will be chosen at random from the collective reveal posts. Make sure to check out each of their blogs and comment for your chance to win. You will not know which blog has been chosen so the more you comment on the better your chances are of winning! You have until Thursday June 18th at 9pm EST to comment  -- winners will be announced on the blog post on Friday, June 19th. 

Check out all the awesome Design Team Blogs below to enter:


Thank you so much for stopping by!
Hope you enjoyed it!
Make sure to check out the other designers' blogs and leave a comment!

Newton's Nook Designs

Wednesday, August 30, 2017


Hi, there lovelies!
I am up on the Newton's Nook Designs Blog today!
So kids are going back to school, or they already have, and if you're like me, going back to school shopping and getting a teacher's gift are so stressful! But at least, making a card/tag to go with the gift is fun with NND ;-)


Newton's Nook Designs Newton Dreams of New York Set - Naki Rager


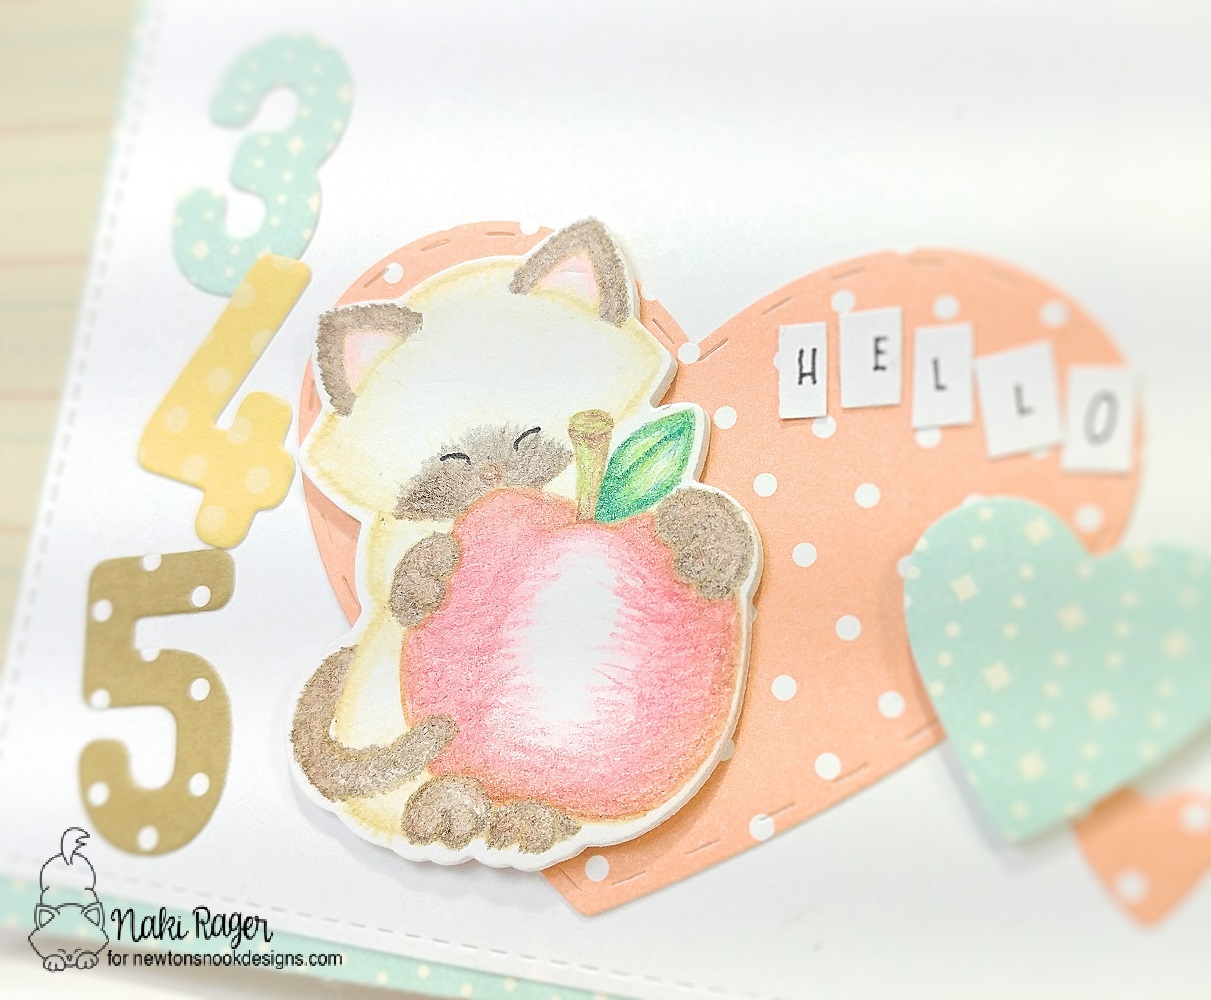
This cute kitty holding an apple is a perfect image for teachers!
It is from the Newton Dreams of New York set and it is supposed to be the "Big Apple", but hey, we all love to stretch the sets we own to their maximum use, don't we? After all, aren't we all creative!? ;-)


Newton's Nook Designs Newton Dreams of New York Set - Naki Rager


I was having the most difficult time coloring last week, I don't even know how many of the same images I colored! I was finally happy with this one right here, which was colored with the colored pencils. I stamped him with Antique Linen Distress Ink on Neenah Solar White Cardstock, and I tried to color him fuzzy but it was pretty challenging with the pencils! I die cut this cutie with the coordinating die, and a few more to layer and give a dimension. I prefer this way instead of using foam tape :-)


Newton's Nook Designs Newton Dreams of New York Set - Naki Rager


The little sentiment was handwritten with the Sakura 0.20mm pen then chopped up! 
With the soft colors and soft coloring, I didn't want a big, bold sentiment so this was perfect, especially on my sweet polka dot hearts, which were die cut with the Darling Hearts purr-fect Die set.  


Thank you so much for stopping by!
Hope you enjoyed it!
Have a lovely day, my friends!


Newrton's Nook Designs August Release Day 3

Wednesday, August 16, 2017


Hello, lovelies!
Welcome back to the Newton's Nook Designs August Release!
All the new products will be available for purchase this Friday the 18th over at the Newton's Nook Designs Shop!
Today is day 3 of the reveal, and we are showcasing the Knight's Quest set along with the coordinating die set! 


Oh man! Princesses yesterday, now the knights!
And do you see that cute but fierce dragon there!? EEEEK!
Alright, here I go...;-)


Newton's Nook Designs Knight's Quest Set - Naki Rager


This handsome knight actually reminded me of King Arthur, and when I say King Arthur, I'm talking about the one from the British TV show Merlin (I miss that show so much!). So he is royal, and I immediately thought of "Royal Blue", and I LOVE blue with yellow! 


Newton's Nook Designs Knight's Quest Set - Naki Rager


He was TONS of FUN to color! 
I wanted a crazy, bright color for his armor, but his royal colors looked so good, I colored it gray ;-) A white horse and gold accents on black and white background really make my knight pop, don't you think!!? 


Newton's Nook Designs Knight's Quest Set - Naki Rager


My second card is all about this cute dragon💖
This poor guy is under attack! But fear not! He is a fire breathing dragon! {wink}
I borrowed the sentiment "I believe in you" from the Once Upon a Princess set ;-) 


Newton's Nook Designs Knight's Quest Set - Naki Rager


He is mad! but still so stinkin' cute 💖
He was heat embossed with black on watercolor paper, water colored, then die cut with the coordinating die. Ohh, I just LOVE his cute, fierce face! 


{Would you like to win the “Knight's Quest” Stamp Set?}
This set will be given away to ONE lucky winner


Here's how to win: 
Comment on the NND blog and Design Team blogs (see list below)! The winner will be chosen at random from the collective reveal posts. Make sure to check out each of their blogs and comment for your chance to win. You will not know which blog has been chosen so the more you comment on the better your chances are of winning! You have until Thursday August 17th at 9pm CST to comment  -- winners will be announced on the blog post on Friday, August 18th

Check out all the awesome Design Team Blogs below to enter:


Thank you so much for stopping by!
Hope you enjoyed it!
We have one more set to reveal tomorrow and you won't want to miss this one!


Cupcake Inspirations Challenge 398

Sunday, March 12, 2017

Hi there, Happy Sunday!
It is time for another Cupcake Inspirations Challenge!
This week's sponsor is DRS Designs!


We have this beautiful color combo for you to play with this week!
Here is my take...;-)


Isn't this just out of this world!!? {giggle}


The sponsor very generously provided each sweetie our choice of rubber stamps, thank you so much! Based on the colors, I thought this Space Boy Skip would be so cute and fun!
I stamped the image with Smoky Slate Ink on watercolor paper and colored in with Zig Clean Real Brush Set and Stampin' Up! Reinkers, then it was fussy cut. 
I am so in LOVE with this adorable image!


The background was also water colored with this week's colors, {green, pink, and gray}.
I also received the Splatter Background Stamp from the sponsor (thank you again!), it was heat embossed with Blushing Bride emboss powder all over my space panel. 
Those planet images and the sentiment were borrowed from the Rocket Stamp Set by Studio Calico. On my vellum banner, I also heat embossed some stars that are on the little astronaut stamp. 


Thank you so much for stopping by!
Hope you enjoyed it!
Make sure you head over to the Cupcake Inspirations Challenge Blog and check out what my teammates have created this week! 


More Kids Party

Thursday, April 9, 2015

Hi there!
My son had a couple more parties to go to, and I want to share the cards and wrapping I made for them.


This is a CASE from one of the Pretty Pals, Tricia, her blog is Butter Dish Designs


Here is her card.
I just loved how she used the Gorgeous Grunge stamp on a baby card, and the colors and wahi tape... everything was just perfect together! My favorite part of all is that one round corner, it gives a softer look!


I stamped my super kitty right on the Very Vanilla cardstock first, but I didn't like it. So I stamped him again on another piece of cardstock, snipped him out, and placed him slightly off from the original image. I don't know why he didn't come with some super hero disguise like his dog partner. 


And here he is, all ready to back up his kitty partner on the inside of the card!


I wrapped the gift with one of those packing papers that was used in some package. I try to reuse anything and everything I can.  You should see my glass jar collection! I don't know what I'll do with them...LOL


This was for another party. She likes Frozen and Ninja Turtles. 
I didn't know what the theme was going to be, so I made Olaf into a ninja! He looks a little confused! Ha ha
His arms are a couple of branches from this tree die from My Favorite Things Spooky Scene Die-namics. I trimmed extra twigs.


I actually stamped a little snowflake with the Silver Encore Ink Pad all over the wrapping (this was some tissue paper that I reused) but I forgot to re-take photos...


My notes...

Super Kitty Card

Stamp: Gorgeous Grunge, Cool Kid (Retired)
Paper: Very Vanilla, Baked Brown Sugar, Coastal Cabana, Tangerine Tango
Ink: Baked Brown Sugar, Coastal Cabana, Tangerine Tango, Gold Encore Ink Pad (on the gift)
Accessory: Retro Fresh This and That Washi Tape
Tool: Corner Round Punch 


Ninja Olaf Card

Stamp: Dear Santa (Snowflake on the gift: Not photographed)
Paper: Whisper White, Basic Black, Soft Suede, Pacific Point, Pumpkin Pie, DSP Stack (Retired), Silver Glimmer Paper
Ink: Silver Encore Ink Pad (On the gift)
Tool: 2" and 1-1/4" Circle Punches, Large Oval Punch, Owl Builder Punch (Small circles for the buttons), My Favorite Things Spooky Scene Die-namics 


Thank you so much for stopping by!
Hope you enjoyed it!


Kids Birthday Parties

Monday, March 16, 2015

Happy Monday, my loves!
Today I wanted to share something different with you!

I threw a first big birthday party for my oldest son's 5th birthday 2 weeks ago.
if you read my previous post about the invitations I made, you know that it was at this party room that the fire station rents out for anyone. 

We were supposed to go inside and start decorating 2 hours prior to the party but they gave us a wrong code for the lock box, and we could not find the guy who was in charge of it until only an hour before the party started, so unfortunately, I didn't get to take the before pictures of a lot of things... but here are some that we did take!


Here is the cake table.
I taped the red, orange, and yellow streamers on the wall like it was on fire! 
Super cheap, super easy!
The banner was made with The Banner Framelits dies with the Very Vanilla and Summer Starfruit cardstock. I used the Typeset Alphabet Bigz die (Retired) and when everything was assembled together, I embossed them all with the Lucky Star Embossing Folder. 
To finish it up, I tied some white ribbons with black paw prints and plain black ribbon.


Sorry about the quality of this photo, I had to blow it up.
Red and yellow balloons as fire, and white with black dots as dalmatians. I stuck black circle stickers all over the white balloons to make those spots! The idea was found on Pinterest and it saved my life because I could not find them any where! I bought a dozen each and tied them onto stuffed dalmatians, and they sat so cute on the tables that were covered with black tablecloths. 


We had several fun games for the little ones to play, super huge thanks to my husband's aunt, Jube (her name is actually Judy but my son calls her that) and I made quick signs for them. This is the only picture we took. But as you can see, I coordinated them all with the Summer Starfruit cardstock and Basic Black letters. Those cute firefighter stickers were some of the leftovers from the little prizes that I put in small cellophane bags. 


Here is a really cute craft for the little ones.
We gave them small black circle stickers, and they got to give their dalmatian puppies their spots! No mess, but super fun!


We had these plastic fireman helmets for the little ones. I made this special badge for my son's. 


Favor for his friends.


I didn't think they were exactly the cutest puppies I've seen, so I gave them pretty SU ribbons and name tags. Don't they look better!?


Here are the name tags.


I found this cute little firetruck die on Etsy. 
I totally abused it for this party! LOL
That cute little alphabet stamp set is from Target's $1 shelf, this one was actually given to me by my lovely friend Nina because my Target did not have them! I LOVE the font, and how they mixed up upper and lower cases! So cute!

This particular pup has an Early Espresso ribbon because my son's favorite color is "Chocolate Brown" 

The kids had so much fun playing all the games and craft, but the biggest highlight of all was the tour of the fire station! 

My husband's little cousin (he was only 4 when we got married, and although he now is a proud firefighter and a college student, he is still a "little" cousin to me) is a firefighter at this station, and lucky us, all the trucks and ambulances were home! So we all got to look, get inside, even turn the lights one and stuff! It was our private open house! Now, what little kid would NOT enjoy that!? 


I don't post pictures of my kids on Internet, you just don't know who sees them and what they do with them...
Anyway, here's one that he was in one of the ambulances.


Now, here are a few pictures of his friend's birthday from this past weekend. It was at a pizzeria, I thought they were only going to sit and eat pizza...NO! They had a little tour in the kitchen and the kids even got to help make pizzas! (And my husband and I made a mental note... DO NOT ORDER from them on weekends! LOL)

The birthday boy loves Ninja Turtles so the kids wore green, and his mom made the turtle shells out of green plastic veggie platters, and felt Ninja Turtle masks! So cleaver!


And this is the card I made, and the gift wrapping.


So easy I don't need to tell you how I made them, do I !? LOL


I attached the card on the back of the present with that cute little red laundry pin that I had bought around Christmas at Target. I love their $1 shelves, but then, who doesn't !?


So that is it! 
My son's invited to 3 more parties the next 2 months, and there will be at least 2 more in summer! I will be making cards and cute wrapping, so stay tuned!

Thank you for reading this long post,  I hope you enjoyed it!